Kyst til Kyst Stien (KtK) – Your guide to stages, accommodation, route and all information
- Jan 9
- 14 min read
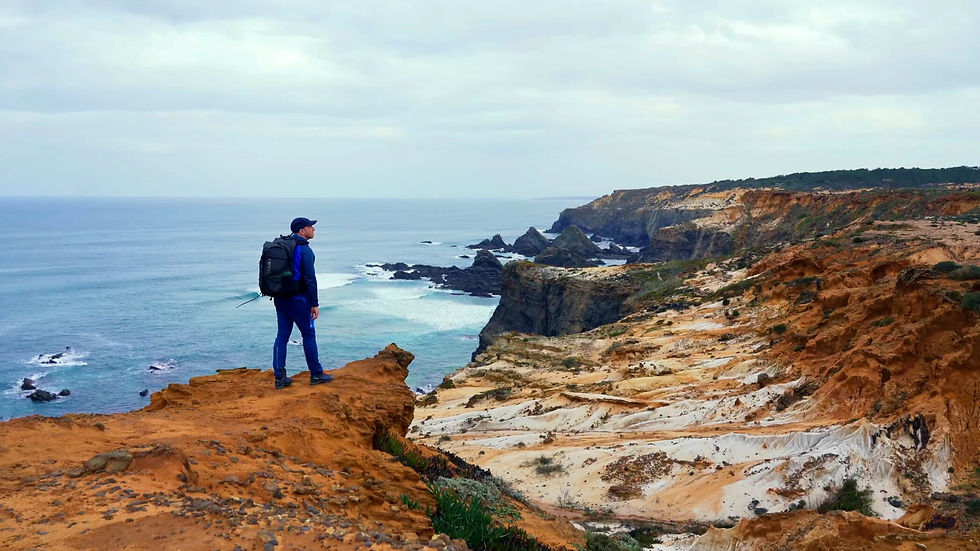
The Kyst til Kyst Stien is a spectacular, approximately 130 km long-distance hiking trail that runs across Jutland and takes you through three completely different Danish landscapes – from the rugged North Sea coast to the tranquil Vejle Fjord. In this article, you will find all the information you need for your planning. I will introduce you to each stage in detail, including numerous highlights and all accommodation options. This gives you all the relevant information at a glance and allows you to plan your hike easily and specifically.

Contents
1. Getting there
2. Route
3. Stages
4. Accommodation
5. Experience report
6. Further information
7. Packing list
8. GPX and map information
9. Conclusion
Kyst til Kyst stien
The Kyst til Kyst Stien is a long-distance hiking trail approximately 130 km long. Along the way, you will hike through quiet forests, vast dune landscapes, along small rivers such as the Varde Å and the Holme Å, and through cosy Danish villages. In the villages, you will discover typical Danish cuisine – from classic smørrebrød (open sandwiches) to hearty dishes such as frikadeller (meatballs) or stegt flæsk med persillesovs (pork with parsley sauce). To finish off, indulge in sweet desserts such as æbleskiver (fried dough balls). The trail is well marked, easy to plan and ideal for anyone who wants to hike through one of Denmark's most unspoilt regions in a relaxed manner and without any significant elevation gain.

Getting to the Kyst til Kyst Stien
Getting to Kyst til Kyst Stien is generally straightforward. The official starting point in Blåvands Huk (Blåvand on the North Sea), near the lighthouse, can be reached by taxi via Varde.
Alternatively, you can start your hike in the slightly larger town of Vejle. However, you should note that continuing your journey by public transport from Blåvands Huk to Varde or Oksbøl after completing your long-distance hike is considerably more difficult. Taxis are only available to a limited extent there, and the nearest train station is about a four-hour walk away. In this case, you may have to resort to carpooling.
Below you will find the best options for your arrival and departure.
By aeroplane
The nearest airport is Billund Airport (BLL). Alternatively, you can also travel via Copenhagen (CPH) or Hamburg (HAM). To find cheap flights, I recommend Skyscanner – a clear app that allows you to quickly find the best flight deals.
By train
You can reach the starting point via the train station in Varde and continue your journey by taxi from there. Trains from Copenhagen or Billund Airport (BLL) usually run every hour and take you comfortably to Varde. It is best to book your ticket in advance via Rejseplanen, DSB (Danish State Railways) or the OMIO app.
Travel times:
Copenhagen → Varde: approx. 3 hours 10 minutes
Billund Airport (BLL) → Varde: approx. 50 minutes
Hamburg → Varde: approx. 6 hours
Taxi: From the small town of Varde, I recommend continuing by taxi to the official starting point.
Hiking to the starting point: Alternatively, you can hike from Oksbøl to the starting point. To do this, take the train from Varde towards Oksbøl and allow for about four hours of walking time.
Return journey: As the Kyst til Kyst Stien is not a circular route, your hike ends in the small town of Vejle. From there, you can easily return to the airports by train or bus.

Kyst til Kyst stien Route
The Kyst til Kyst Stien is classically divided into seven easily manageable stages. Depending on the section, the trail runs through quiet, expansive landscapes, but sometimes also through forests – mostly easy to walk with a difficulty rating of T1. There are no exposed passages, making the hike ideal for beginners and, in my opinion, also suitable for children aged 12 and above.
Waymarkings
The Kyst til Kyst Stien is very well marked throughout. Signposts with a white hiker on a blue sign reliably show you the right way.

Remember to insure your trip well – because a fall or other typical hiking injury can quickly result in high rescue costs. Auras Insurance offers you worldwide hiking and trekking insurance, specially designed for active travellers.
Use the discount code HIKINGFEX to get 10% off your insurance.

Kyst til Kyst Stien stages
The Coast to Coast Trail is traditionally divided into seven stages. Alternatively, there is also a six-day version starting in Vejle, which I have also listed below. Each stage has its own unique scenic features. There is never more than around 120 metres of ascent per day, which makes the hike very easy and relaxed, both from a fitness perspective and for children.
Kyst til Kyst Stien classic in 7 stages:
Stage 1: Blavands Huk - Oksbol (22km)
Stage 2: Oksbol - Varde (19km)
Stage 3: Varde - Nordenskov (19km)
Stage 4: Nordenskov - Hovborg (21km)
Stage 5: Hovborg - Baekke (19km)
Stage 6: Baekke - Bindeballe (16km)
Stage 7: Bindeballe - Vejle (24km)
Outdooractive: https://out.ac/3x9H9p
Coast to Coast Trail in 6 stages starting in Vejle:
Stage 1: Vejle – Bindeballe Station (24 km)
Stage 2: Bindeballe Station – Bække (22 km)
Stage 3: Bække – Hesselho (20 km)
Stage 4: Hesselho – Karlsgårde (24 km)
Stage 5: Karlsgårde – Kjelst (29 km)
Stage 6: Kjelst – Blåvandshuk Lighthouse (22 km)

Kyst til Kyst Stien Accommodation
Along the Kyst til Kyst Stien, you will find a wide range of accommodation options – from cosy bed and breakfasts and small hotels to campsites and nature-friendly shelters. You can book your accommodation directly via the following links on my partner platform Booking.com at no extra cost to you.
As always, the earlier you book, the cheaper the prices tend to be. For a small surcharge, most accommodations also offer free cancellation in case your plans change at short notice.
Tip: In the classic seven-stage version, there is a campsite available at the end of almost every stage. The slightly larger village of Varde is an exception – here you will have to find alternative accommodation or adjust your stages accordingly. In the six-day version, however, you will always find a campsite or shelter at the end of each stage.
Please note: If you only want to use shelters, you should still bring a tent with you, as the shelters can fill up quickly, especially in the high season.
Starting point: Blavands Huk
Stage 1: Oksböl
Stage 2: Varde
Stage 3: Nordenskov
Campsite without a name at the end of the stage
Stage 4: Hovborg
Campsite without a name at the end of the stage (Shelter)
Stage 5: Baekke
Bække Anlæg Shelterplads (Shelter) - directly by the small lake in Baekke below the fountain
Stage 6: Bindeballe
Stage 7: Vejle

Kyst til Kyst stien Difficulty
The Kyst til Kyst Stien is a very easy long-distance hiking trail overall. The challenges arise less from the terrain and more from typical natural influences such as weather, wind and changing conditions along the route.
As with any hike, special caution is required in bad weather – especially during thunderstorms and strong winds, for example due to falling or damaged trees. After several days of heavy rain, individual sections of the trail may also be temporarily flooded.
With lightweight trekking shoes or trail running shoes, this is usually not a problem: you can easily cross the affected passages, even if the water reaches up to your knees, and then continue hiking with wet shoes.
If you want to avoid wet shoes, waterproof shoe covers are a good option, which I have linked below.
The following picture shows a section of the path after three days of continuous rain:

Kyst til Kyst stien guide
In this guide, I will introduce you to each stage of the Kyst til Kyst Stien in detail. My experiences are as varied as the hike itself. Since the trail is very well marked and nowadays most people navigate with their smartphones anyway, I will spare you detailed route descriptions. Instead, I will focus on insider tips and special highlights along the way and at the end of each stage.
Stage 1: Blåvands Huk – Oksbøl (22 km)
The first stage begins at the westernmost point of Denmark in Blåvands Huk, right on the often stormy North Sea. After a short visit to the lighthouse, which is located in the immediate vicinity, as well as the adjacent Stp Blåvand bunker ruins and other bunker facilities from the Second World War, your hike begins.
The trail first takes you along the beautiful sandy beach. On the way, you will pass the famous Horse sculpture – an impressively converted bunker ruin. Only later do you turn north into the interior of the country.
Tip: Keep an eye out for houses built in typical Danish style along the way. The thatched roofs in particular are well worth seeing.
The hike then continues along easily accessible paths through plantations, over a few gravel roads and through holiday home areas.
Tip: You will pass right by the Tirpitz bunker, which is definitely worth a visit. Not far from there is also the Tripitz Bunker Museum.
Further on, you will reach a road, which you follow for a short distance. From here, you can take a short detour to the Oksby Kirke Ruins.
Finally, you will reach the fish ponds of Oksbøl, where your first stage ends.
Tips for Oksbøl:
Restaurant in Oksbøl

Stage 2: Oksbøl – Varde (19 km)
Start as early as possible so that you have more time in Varde – there is a lot to discover there. The route to Varde is easy to walk, but as you will not always be in the shade, you should consider wearing a hat. On the way, you can make a detour to Janderup, where there is a Coop supermarket. A little off the beaten track, but almost directly on your route, is the Lutheran Janderup Church, which you can also visit.
Your stage finally ends in Varde, a charming little Danish town. Enjoy the evening atmosphere and Danish cuisine after a walk along the Varde River.
Tips for Varde:
Walk through the centre with dinner

Stage 3: Varde – Nordenskov (19 km)
Leave Varde after a hearty breakfast and enjoy typical Danish hospitality. Follow the Varde River in a north-easterly direction. About halfway along, you will reach the beautiful lake with the melodious name Karlsgarde Sö. Be sure to visit Tambours Have there.
Your route then continues along the river to the north of Nordenskov, where your stage ends. If you still have energy reserves, you can visit the pretty village of Nordenskov. There you will find barbecue restaurants, shops and a supermarket.
Tips for Nordenskov:
Dinner in a restaurant

Stage 4: Nordenskov – Hovborg (21 km)
Start early again, as you have a 21-kilometre hike along the beautiful river ahead of you. Unfortunately, there is no restaurant in the evening, but if you make it there in time and it is not a Sunday, you can buy something at the supermarket or eat something at the campsite. There is also a bar – if it is open, you can stop there as well.
About halfway along the route, you will reach the village of Tofterup, where you can buy supplies at the supermarket. It is also worth visiting the Vester Starup Church there. Shortly before Hovborg, you can take a detour to Baldersbæk Plantage – a scenic spot with several attractions, such as the 3 herreds stenen.
Tips for Hovborg:
Dinner at the campsite or in the bar
A walk around the fish pond called Hovborg FiskesøVisit the church Hovborg Sogn
Visit Store Jyndovn just outside the village

Stage 5: Hovborg - Baekke (19 km)
Another breathtaking river hike through a scenic area follows. Start early so that you have more time on the trail and in the evening. On this stage, you will be surrounded by nature, so plan to have lunch with you.
If you still have energy in the evening, you can visit the small village of Bække. Your stage ends at the Klebæk Høje runestones. Right next to them is another attraction: the Hamborggårdstenen.
Tips for Baekke:
Dinner at a restaurant
Visit the Hyldals Bryghus brewery
Visit the Bække Sogn church
Visit the Hærvejshuset / Bække Turistkontor village museum

Stage 6: Baekke – Bindeballe (16 km)
Today, a relaxed stage of only 16 km awaits you – ideal for recharging your batteries for the last and longest stage the next day. Be sure to buy enough food, as there are no places to stop for refreshments at the end of this stage.
One of the highlights is a visit to Bindeballe Købmandsgård, an old traditional general store with a museum, shortly before the end of the stage. After visiting the museum, you can extend your tour to include some particularly scenic spots, such as Vejle Ådal Spjarup, Refsgård Lystfiskesøer, Egtvedpigen vandresti blårute and Runkenbjerg.
Tip: I recommend planning this yourself and adding an extra 6–8 kilometres to your route.
Your stage finally ends in Bindeballe. About a kilometre away is Birkelund Shelterplads, which offers several shelters, a fire pit and a toilet.

Stage 7: Bindeballe – Vejle (24 km)
Now it's time to gather your strength for the last stage of the Kyst til Kyst Stien. Although it is 24 kilometres long, it is easy to manage thanks to the mostly well-trodden gravel roads.
About halfway through, you will pass through Skibet, a small village with local amenities. I recommend visiting Skibet Kirke and Stenager Mølle there. You will then cross the Knabberup Sø hiking area before your journey ends at the beautiful Vejle Fjord.
A special highlight at the end of the tour is the architecturally impressive Fjordenhus.
Tips for Vejle:

To prepare yourself optimally for your hikes, I recommend the workouts on my YouTube channel.
Kyst til Kyst Stien – Best time to travel
If you want to explore the impressive coastal and natural landscape of Kyst til Kyst Stien in Jutland, I would say that the months from May to October are particularly suitable. This is when Denmark is at its most beautiful.
In spring, especially in April and May, heaths, meadows and fields bloom in all colours – from the bright yellow of the gorse bushes to the delicate white and pink tones of the fruit blossoms in the villages along the way. The air is fresh and clear, and you will often find yourself hiking the stages almost alone.
In autumn, the landscape is transformed into a play of warm colours – the foliage of the trees glows in shades of gold and copper, the rivers and lakes shine deep blue, and the sunsets bathe the coast in a soft, golden light. It is a quieter time, ideal for those who want to enjoy nature in peace and quiet.

Beware of coastal weather!
The climate is usually harsh: along the coast, the weather can change quickly. Strong winds are common in spring and autumn, and short, intense rain showers are not uncommon.
So here's my tip: Be sure to pack light but weatherproof clothing:
a breathable rain poncho that won't flap around in a storm,
a windbreaker, ideally with a hood – good quality ones are available for men and women,
and good sun protection, especially in summer, but also when it's cloudy – UV radiation on the coast should not be underestimated.
‘The sun shines even behind the clouds.’ Quote from Karl Friedrich Wilhelm Wander

Kyst til Kyst stien – further information
Below, I have compiled some useful information about the Kyst til Kyst Stien for you:
Money: Cashless payments are widely accepted. However, as always, I recommend taking some cash with you.
Wild camping: Wild camping is prohibited along the entire trail, with the exception of official campsites and shelters.
Food: There are places to buy food at the end of each stage or along the way.
Taxi: Bolt and Uber are not available everywhere. In an emergency, you will have to use local taxis.
Water: There are not always water sources along the way. It is best to take at least 2 litres with you from your accommodation.

Kyst til Kyst stien packing list
Here I recommend the most important hiking equipment that I own, have tested myself and have also bought myself. I pay a lot of attention to the weight and quality of my equipment. The equipment should simply feel good on longer tours and also be light. I can recommend the equipment for women because my wife uses it and it is basically the same as the equipment for men.
Note: Please keep in mind that the packing list is general and you will have to adapt it depending on the season and your needs!
Advertising note: These product links are affiliate links. If you buy something through one of these links, I will receive a small commission without you having to pay more. This is for the maintenance of my blog and you support me with my project, for which I am very grateful. Thank you very much!
Clothes
Hiking boots
Hiking shorts
Long hiking pants
Functional shirt
Hybridjacket
Fleece-jacket
Rain jacket
Functional underwear
Hiking socks
Other hiking equipment:
• Sun cap
Hiking backback (approx. 60 litres or as required)
by EXPED - unfortunately not available on Amazon.
• Backback - Ospray (was my old one and is also good)
Technology and orientation:
• Compass
• Headlamp
• GPS device or GPS watch if necessary
• Binoculars if necessary
Catering:
• Sweets to keep up morale :)
Health & first Aid:
• First Aid (small and light)
• Tape
• Bivouac
• Toilet paper
Other:
• Passport/Insurance certificate
• cash
• Gas cartridge
Film equipment:
• Camera
• Drone
• Tripod
• Clip

Kyst til Kyst stien GPX
The GPX files are available for download from the following providers.
Outdooractive: https://out.ac/3x9H9p

Conclusion on the Kyst til Kyst stien – experiencing Denmark's quiet beauty on foot
The Kyst til Kyst stien is much more than just a hiking trail – it is an invitation to discover the quiet beauty of Denmark in all its facets. Between dramatic river landscapes, rolling hills and traditional Danish villages, a landscape unfolds that inspires and brings peace. Whether in sunshine, fog or wind, every step along this trail tells a story of nature, history and the unique atmosphere of Jutland. Those who enjoy getting away from the crowds and are looking for a genuine hiking experience will love the Kyst til Kyst stien – and are guaranteed to return.
As always, I would be very happy to receive feedback via one of my channels.
You are also welcome to leave me a comment here.

Hello, I am Christian, the chief globetrotter of this Site and an enthusiastic adventurer, hiker and filmmaker. I love to explore new paths and inspire people with them, and I love to share my hiking knowledge with you! You can also find my videos on YouTube! On my blog you can find tips for beginners and professionals on the greatest and most beautiful hiking tours there are. I want to encourage people to explore the world as a hiker, whether in the countryside, through the forest or in the mountains. True to the motto: If you haven't hiked, you haven't seen the world,
On my blog, I also write about hiking gear, the right summit training and nature conservation, as well as tips and information about hiking.


A strong PFP choice with minimal visual noise.
You might find better versions on PfpUniverse last week, and it had enough variety to keep browsing for a while.