Lofoten long crossing: Trekking Guide with Route, Accommodation & Stages
- Dec 30, 2025
- 26 min read
Updated: Jan 18
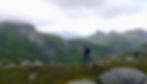
Crossing the Lofoten Islands is a spectacular trekking tour through a rugged mountainous fantasy land in northern Norway. Deep fjords, sparkling mountain lakes, idyllic beaches, towering cliffs and traditional fishing villages characterise this unique landscape. In this article, you will find all the information you need to carefully plan and safely cross the Lofoten Islands. I will introduce each stage in detail and show you exactly when and where you can take the bus and where there are supply options along the route. The guide is supplemented by numerous highlights along the route and a complete overview of all accommodation and campsites.
This gives you all the relevant information at a glance and allows you to plan your Lofoten crossing easily and specifically.

Content
1. Journey
2. Route
3. Accommodation
4. Weather and best time to travel
5. Further information
6. Recommended stages
7. Packing list
8. GPX and map information
9. Conclusion
The Lofoten long crossing at a glance
Length: 160 km – traditionally divided into 11 stages.
Duration: 8–11 days, depending on pace, stage planning, weather and breaks.
Elevation gain: 6,900 metres
Difficulty: The route is not officially marked, but the path is almost always clearly visible and is steep and rocky in places. Sure-footedness, orientation with a map/GPS and alpine experience are necessary – the paths become noticeably more difficult in the rain.
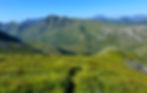
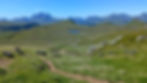
Landscape: You will hike through a magnificent island world of rugged peaks, wild coasts, fjords, sandy bays and traditional fishing villages – a constant alternation between sea and mountains.
Highlights: Matmora Ridge - Nusfjord - the Pipline Ascent - Ryten
Accommodation: Wild camping is mostly permitted in Lofoten, and there are DNT huts, selected campsites and permanent accommodation in Svolvær, Leknes, Ramberg, Nusfjord or Å Lofoten.
Best direction: Many hikers start in the north and head south to Å Lofoten – this offers advantages on difficult passages.
Requirements: Very good physical condition and a head for heights.
Starting point: Officially at the Matmora-Delpen Trailhead in the north.
Weather: The weather is very changeable.
Supplies: There are regular shopping opportunities along the route in places such as Svolvær, Leknes, Ramberg or ÅI Lofoten.

Getting to the Lofoten Islands
Getting to the Lofoten Islands is straightforward and easy to plan. The easiest way to reach the archipelago is via Harstad/Narvik Airport (EVE) in Evenes. There are direct connections to this small airport from many major European cities, mostly seasonal.
I usually try to avoid changing flights. In this case, however, a change was worth its weight in gold, as the onward journey from Harstad/Narvik is extremely easy and comfortable. To find cheap flights, I recommend Skyscanner – a clear app that allows you to quickly find the best flight deals.
Tip: If you arrive late in the evening or leave early in the morning, you can easily book an affordable hotel near the airport. You can find a link to the hotel here: Aiden by Best Western Harstad Narvik Airport
Starting point of the Lofoten crossing
Before you start, you need to decide in which direction you want to cross the Lofoten Islands:
Options:
North → South: Bus to Svolvær
South → North: Bus to Å i Lofoten (with changes in Svolvær and Leknes)
My recommendation: Hike from north to south and start at the Matmora-Delpen Trailhead.
Advantages of starting in the north
Starting in the north has several clear advantages:
In Svolvær, there is a large supermarket and several outdoor shops where you can buy supplies and gas cartridges.
The return journey from Å Lofoten to the airport is easily done by bus.
In Svolvær, there is a taxi rank that will take you comfortably to the starting point.
Alternatively, you can take bus 300 to Jordnes kryss and then bus 733 to Delp.
Demanding key sections are much more pleasant in this direction, such as the pipeline ascent on stage 3 or using the ferry on stage 9 and the subsequent steep ascent at the power station→ these passages are technically easier uphill than downhill.
You can easily add one or two extra days in Å Lofoten and, for example, undertake the famous ascent of Reinebringen. There is a lot to discover there.
Bus: Take bus 300 towards Svolvær directly from the airport. The bus station is located directly in front of the main entrance of the airport. You can find the exact location here.
In Svolvær take the bus 300 to Jordnes kryss and then bus 733 to Delp.
Travel times at a glance
Harstad Narvik Airport → Svolvær: 3 hours
Svolvær → Delp: 2 hours by bus or 30 minutes by taxi
Å i Lofoten → Harstad Narvik Airport: 7 hours (including 2 transfers)
Tip: Alternatively, you can take a slightly more expensive but considerably faster domestic flight directly to Svolvær from Harstad/Narvik Airport (EVE).
Taxi: There is a central taxi rank in Svolvær, which you can find here. In addition, Svolvær Taxi is also available as an online provider.
Ferry: Alternatively, you can also reach the Lofoten Islands by ferry. For example, take the ferry from Bodø to Svolvær or Moskenes. The ferry crossing offers spectacular scenery and is a worthwhile option, especially in calm weather. The disadvantage of this route is that the ferries do not operate in bad weather or strong winds. This can lead to short-term cancellations and delays. For this reason, I would only recommend this route to a limited extent.
As always, I recommend watching my video about the tour:
Lofoten Trekking Route
The Lofoten Crossing is an unofficial, approximately 160-kilometre-long trekking route that takes you through the spectacular island world in northern Norway and is classically divided into eleven stages. The trail runs mostly on unmarked paths – mostly with a difficulty rating of T1 and T2, but also T3 in places – with an alpine character and requires determination, experience, good physical condition and the right mental attitude to withstand the often harsh conditions. There are steep and exposed passages in places, so sure-footedness and a head for heights are absolutely essential. Rain, wind and solitude are part of everyday life here, as many sections lead through remote regions far away from mass tourism. You can expect some altitude differences, several days without supplies, and passages secured with permanently installed ropes and chains. I would only recommend the crossing to experienced hikers.
Infrastructure: Thanks to the good infrastructure, shopping facilities and accommodation along the way, the crossing can still be planned flexibly and adapted to your individual needs. In an emergency, stages can almost always be skipped by bus. This gives you additional flexibility, and you don't have to abandon the entire tour in bad weather.
Roads: To complete the trail, some sections along roads are unavoidable, but these can be bypassed by taking the bus. I will go into more detail on this later in the article.
Ferry on stage 9: There is also a ferry crossing from Kjerkfjorden to Tennesvann kraftverk in Forsfjorde on stage 9. It is important that you clearly inform the ferry staff that you want to go to the power station, otherwise they will not stop there. They will then take you there at your request.
Origin of the trail: This long-distance hiking trail was created by Rando-Lofoten and is composed of well-known hiking trails. Many thanks for that!
Remember to insure your trip well – because a fall or other typical hiking injury can quickly result in high rescue costs. Auras Insurance offers you worldwide hiking and trekking insurance, specially designed for active travellers.
Use the discount code HIKINGFEX to get 10% off your insurance.

Stages of the Lofoten crossing
The Lofoten crossing is traditionally divided into eleven stages. Each stage has its own unique landscape features.
Classic:
Stage 1: Delp – Sandsletta (13 km and 800m ascent)
Stage 2: Sandsletta – Svolvær (13 km and 600m ascent)
Stage 3: Svolvær - Kleppstad (16 km and 500m ascent)
Bus: Bus stop Kleppstad with bus 741 to Bus stop Vikjord (the journey takes 1 hour and 40 minutes). Alternatively, you can organise a lift across the bridges. If you have the necessary change, you can ask people directly at the rest area in Kleppstad.
Stage 4: Vikjord - Store Krenggårsvatnet (19 km and 1260m ascent)
Stage 5: Store Krenggårsvatnet - Leknes (12 km and 140m ascent)
Bus: Bus stop Leknes sentrum to Bus stop Napp with bus 742 or 300 (the journey takes 15 minutes)
Stage 6: Napp - Nusfjord (17 km and 600m ascent)
Stage 7: Nusfjord - Ramberg (19 km and 210m ascent)
Bus: Bus stop Ramberg with bus 771 to Bus stop Fredvang nord (the journey takes 20 minutes). Alternatively, you can cross the bridges on foot, but be aware of the traffic as there is only a very small pavement for pedestrians.
Stage 8: Ramberg - Selfjord Bay (18 km and 680m ascent)
Stage 9: Selfjord Bay - Kirkefjord Ferry Terminal, then continue by ferry to Tennesvann kraftverk (departure usually at 3 p.m.) - DNT Munkebu (23 km and 1150m ascent)
Stage 10: DNT Munkebu – Ågvatnet (14 km and 650m ascent)
Stage 11: Ågvatnet – Å i-Lofoten (12 km and 770m ascent)
Outdooractive: https://out.ac/3xAkep

Accommodation on the Lofoten Crossing
Along the Lofoten Crossing, you will find a wide range of accommodation options – from cosy bed and breakfasts and small hotels to campsites and nature-friendly mountain huts. You can book your accommodation directly via the following links on my partner platform Booking.com at no extra cost to you. I recommend a mix of wild camping, mountain huts and permanent accommodation.
As always, the earlier you book, the cheaper the prices tend to be. As Lofoten is becoming increasingly popular, it is advisable to reserve all formal accommodation well in advance. At Booking.com, you also have the option of cancelling your accommodation free of charge up to one day before arrival for a small surcharge. Especially in bad weather, you will really appreciate taking a hot shower and sleeping in a tent without rain after two or three days in the wilderness. You can also dry your clothes and equipment. I therefore recommend planning at least fixed accommodation in Svolvær, Leknesand Sørvågen or Å i Lofoten.
Wild camping: This is possible throughout the entire crossing and often necessary, especially at the end of stages that offer no other accommodation options. Be sure to observe the right of public access and never pitch your tent on or directly next to private property. Choose your wild camping spot with common sense – in a place where no one will be disturbed and where no work such as forestry or agricultural activities is taking place.
Refuges: Along the way, you also have the option of staying overnight in refuges belonging to the Norwegian Trekking Association (DNT). No reservation is required.
Stage 1: Sandsletta
Sandsletta campsite
Stage 2: Svolvær
Lofoten Holiday Centre (Campsite)
Stage 3: Kleppstad
Rystad Lofoten Camping - $$ (only 2 days)
Stage 4: Store Krenggårsvatnet
Stage 5: Leknes
Stage 6: Nusfjord
Stage 7: Ramberg
Wildcamping in Ramberg
shelter
Campsite
Stage 8: Selfjord Bay
Wildcamping
Stage 9: DNT Munkebu
Stage 10: Ågvatnet
Stage 11: Å I Lofoten

Guide to crossing the Lofoten Islands
In this guide, I will give you a detailed overview of each stage of the Lofoten crossing. My experiences are as varied as the hike itself. Since most people now use their smartphones for navigation, I will spare you detailed route descriptions. Instead, I will focus on insider tips and special highlights along the way and at the end of each stage.
Stage 1: Delp – Sandsletta (13 km and 800m ascent)
Your hike begins near Delp at the Matmora-Delpen Trailhead. This is followed by a steep but technically easy ascent to the 336-metre-high Delpen. You will then reach a vast plateau with an impressive 360-degree panoramic view of the majestic mountains of Lofoten.
The route then takes you over the Matmora ridge, which is somewhat steep in places and requires a head for heights. You will eventually leave the trail at the road and follow it to Sandsletta campsite, your destination for today. There is an inexpensive and extremely good restaurant, an outdoor sauna right by the water and shower facilities.
Tip: If the weather is good, you can also pitch your tent by Lake Botvatnet and hopefully watch the sunset. The sun never completely sets from the end of May to mid-July, so you have a long golden hour.
Don't forget to take an emergency bivouac with you. It consists of an emergency blanket that is cold-resistant, a whistle and a mini compass. It should be in your backpack on every hike anyway.
As the old Scottish saying goes: "There's no such thing as bad weather, only bad clothes!"


Stage 2: Sandsletta – Svolvær (13 km and 600m ascent)
It's best to start early with a hearty breakfast at the campsite and enjoy some Norwegian delicacies. Then follow the road again to Haugen, where the trail becomes more natural and leads you through a forest up the mountain. The ascent is easy and offers beautiful views of the surrounding countryside. Due to the constant rain at the time I was there, the ground was completely soaked and muddy. This made the hike challenging but doable. However, my feet were wet the whole time. A little later, you will reach Lake Isvatnet, the first of several mountain lakes. From here, the mountain landscape becomes increasingly rugged.
A key point awaits you at the next Lake Botvatnet: here you have to overcome a short passage with a difficulty rating of T3. Sure-footedness is required. As you continue your descent, there are also two places where you will need to use your hands to help you. Be aware that the rocks can be very slippery when it rains. From this point, you can already see Svolvær in the distance. You will then come out at the pipeline by the lake and walk along the wooden footbridges on the shore. The rest of the trail is beautiful and easy to walk. At the end of the stage, the campsite at Lofoten Friesensenter awaits you. Take the opportunity to stock up on food supplies in Svolvær. The next opportunity to do so will not be until you reach Leknes.
If you still have energy, you can extend your tour with a mountain hike to the following viewpoints at Tuva (T2-T3) – but you should leave any heavy luggage behind:
Tip: If the weather is not so good, you can also consider staying overnight in Svolvær – a beautiful small town with great attractions.
Tips for Svolvær:
Walk along the Svolvær Promenade
Enjoy local cuisine


Stage 3: Svolvær – Kleppstad (16 km and 500m ascent)
It is best to start early again, as today is the most challenging stage of the entire tour. Right at the start, you have to climb a steep rock face next to a pipeline with an elevation gain of around 200 metres. You will definitely need to use your hands to help you. The ascent is secured with permanently installed ropes and chains to help you climb. The pipeline is located at the Kongsfossen power station.
Warning: In heavy rain, this stage is strongly discouraged, as the ascent can quickly turn into a small waterfall and become extremely slippery. Once you reach the top, there is a hut waiting for you. There you will have the opportunity to make a short detour to the summit of the 437-metre-high Dronningtinden. The subsequent descent is technically easy, but can be completely muddy. Follow the path to Kleppstad.
If you have time, you can take the bus directly to Vikjord from the Kleppstad bus station at the end of the stage. The next stage is very long, so you will have much less stress the following day. In Vikjord, you can easily spend the night in a tent. Simply continue along the trail and find a suitable camping spot. In case of bad weather, you can alternatively hike from Kleppstad about 2 kilometres uphill to Rystad Lofoten Camping. Cabins are available there, but call ahead to be on the safe side so you don't hike there for nothing.
Tip: If you still have energy, you can climb the rewarding 534-metre-high Kleppstadheia.
There are two possible options for continuing your journey:
Bus: Take bus 741 from the Kleppstad bus stop directly to the Vikjord bus stop. The journey takes about 1 hour and 40 minutes, as the bus takes a detour via Leknes and does not go directly to Vikjord.
Carpool: At the car park in Kleppstad, you can try to find a ride across the bridges. With a little change, your chances increase significantly. Please note that you will need Norwegian kroner.


Stage 4: Vikjorda – Store Krenggårsvatnet (19 km and 1,260m ascent)
Your tour starts in tranquil Vikjord. I don't think it's even a real village, but rather a collection of houses. In any case, there are no supplies available there – or on the next day until you reach Leknes.
Your route first takes you to the summit of Dalstuva. Enjoy the magnificent view there and once again watch out for steep terrain. After that, the route goes up and down repeatedly. You also have to cross a spectacular ridge path that is steep. The trail continues to the 460-metre-high Brattfloget. You won't quite reach the summit of the next peak, Blåtinden, which is 604 metres high, but if you still have the energy (T2), you can climb it. This requires an additional 150 metres of elevation gain. Otherwise, follow the trail to Lake Store Kringlebotnsvatnet, where your day's stage ends.
There you will find a cosy mountain hut (VVJFF Gammen) with a grass-covered roof. Inside there are four beds and a table, and outside there is a fireplace. If the hut is full, you can also sleep on the floor. Enjoy the peace and quiet of the lake, which is surrounded by mountains. Perhaps you will even experience a similar spiritual feeling to mine and be able to connect completely with nature.
For the evening, I recommend just a walk by the lake, a good dinner and meditation in the evening sun, if you have one.
Tip: If you want to shorten the stage due to the altitude, the Kvilebua mountain hut is a good option for an overnight stay.

Stage 5: Store Krenggårsvatnet – Leknes (12 km and 140m ascent)
Today, a short stage to Leknes awaits you. Use this short distance to recharge your batteries and perhaps take a rest day in Leknes. The route there is beautiful, but short and without any particular highlights. It took me about four hours.
I would definitely recommend taking a rest day in Leknes, if you have time. Persistent rain and bad weather can have a significant impact on your mental health. There is no shame in taking a rest day. Treat yourself to a room, dry your clothes, replenish your supplies and enjoy a decent meal – your inner voice will thank you for it.
Tips for Leknes:
Take the bus to Borg and marvel at the world's longest viking longhouse at the Lofotr Viking Museum (the bus ride only takes about 17 minutes). There you can also visit a viking ship, a Ruin and a church.
Enjoy a good dinner in Leknes with regional cuisine.
Hike up the 104-metre-high local mountain – Borgatoppen
Otherwise, Leknes is not a particular highlight. The town is more of a modern, small-scale industrial town. However, you can buy almost everything there – take advantage of this opportunity.

Stage 6: Napp – Nusfjord (17 km and 600m ascent)
In the morning, take the bus from Bus stop Leknes sentrum to Bus stop Napp with bus 742 or 300. A strenuous and challenging coastal stage awaits you to Nusfjord, an idyllically situated fishing village. Along the way, you will have to negotiate a few steep sections, but these are secured with ropes. On the way, you will have to negotiate a few steep sections again, but these are secured with ropes. However, the path is marked throughout.
Before you leave the coast, you can take a detour to Storbathellaren Cave. It is a historically significant cave in Lofoten and is known as one of the oldest settlements on the islands, with archaeological finds dating back 6,000 years. The access is rocky. You will also pass right by the small village of Åndopen.
After a short section through the interior, you will reach the beautiful Morpheus Beach, which is surrounded by an imposing mountain basin – well worth seeing! Then follow the path south, which eventually turns into a road and leads you to Nusfjord.
There are very few permanent accommodations in Nusfjord. If they are all occupied, wild camping is the best option. However, a public toilet facility is available.
Tips for Nusfjord:
Dinner at a good fish restaurant
Hike to Mellomvatnet
Walk along the Nusfjord promenade

Stage 7: Nusfjord – Ramberg (19 km and 210m ascent)
I had a wonderful night in my tent. It was completely quiet, and I could listen to the sounds of nature and observe all kinds of wildlife. But what I enjoyed most was the silence.
Today, there is another short coastal section – unspoilt, rocky and somewhat steep, with a section secured by ropes – until you finally reach the road and arrive in Nesland.
Before you reach the road, you will pass a few highlights:
The rest of the route along the road is easy but offers great views. You will pass a few beautiful beaches along the way. Otherwise, there are no major highlights. Be sure to watch out for traffic on the road. You can also look for a ride.
In Ramberg, there is permanent accommodation, a campsite and a supply point. You can also take the bus across the bridge there the next morning. You will spend the next two days without permanent accommodation again, unless you use a shelter, of course. So be sure to stock up on enough food again.
Tips for Ramberg:
Tip: From Ramberg, I can recommend the challenging mountain tour (T4) to the 696-metre-high Moltinden. Only possible in clear visibility and good weather – difficult mountain tour! The 483-metre-high Flakstadtind is significantly easier (T1), but also further away. You will need an extra day for this.
Tip: On this stage, you can also continue on to Fredvanghytta and spend the night there.


Stage 8: Ramberg – Selfjord Bay (18 km and 680m ascent)
In Ramberg, take bus 771 again at the Bus stop Ramberg to the Bus stop Fredvang nord. The journey takes only about 20 minutes. Start as early as possible, as there is a lot to discover again.
Then follow the trail and continue to the Kvalvika Beach Trail Head. There you will enter a fascinating hiking area. Your next big highlight is the 543-metre-high Ryten, a popular destination for excursions. Enjoy the view from the top of Kvalvika Beach, which you will cross after descending from Ryten. The descent to the beach is rocky. After Kvalvika Beach, the trail runs along the cliffs and leads you to the next key point, which requires sure-footedness and concentration. There you will need to use your hands on rope-secured passages.
The rest of the hike takes you through an extremely scenic area until you finally arrive in Selfjord, where the DNT Selfjordhytta awaits you. There is also a small area for camping there.
In the evening, enjoy the silence, the sounds of nature and all kinds of diverse nature observations.

Stage 9: Selfjord Bay – Kirkefjord Ferry Terminal Continue by ferry to Tennesvann kraftverk (departure usually at 3 p.m.) – DNT Munkebu (23 km and 1,150m ascent)
Start early again, as you need to be at Kjerkfjorden in time for the ferry. It usually departs at 3 p.m., so it's best to be there around 1 p.m. to be on the safe side. Also, keep in mind that the ferry only runs once a day. After a short, easy hike across the beach, there is an ascent with a crossing over a saddle. Immediately afterwards, you will reach a short high trail and another saddle crossing. Then begins the descent to Kjerkfjorden, a small, isolated fishing village that can only be reached by ferry. Shortly before Kjerkfjorden, there is a turn-off to a beach that you can visit.
Take the ferry at Kirkefjord hurtigbåtkai.
Please note: You must explicitly tell the ferryman that you want to go to the power station – otherwise the ferry will not go there. The crossing takes about 30 minutes. From the power station, another challenging climb over rocky terrain awaits you. However, you will be rewarded with an incredible view of the mountains, which is certainly one of the most beautiful sections of the entire tour. There are numerous mountain lakes here, as well as the highest mountain in the Lofoten Islands.
Please note: If you are hiking from south to north, you must contact the ferry in advance by telephone to arrange collection.
If you want to climb the 1029-metre-high Hermannsdalstinden (T5) the next morning, you can pitch your tent at the end of the stage. Otherwise, the DNT Munkebu refuge is a good place to spend the night (please note: the refuge is currently closed).
Alternatively, you can also climb the 770-metre-high Munken nordtopp (T4), which also offers magnificent views. However, these mountain tours were too difficult for me. Many hikers leave their heavy equipment at the campsite for the climbs.

Stage 10: DNT Munkebu – Ågvatnet (14 km and 650m ascent)
I hope you had as beautiful and peaceful a night there as I did. The air was cool but clean and clear, and you could really feel nature all around you. The mountain landscape here is extremely rugged, but the descent is actually not as difficult as the surrounding landscape might initially suggest. However, there is one section secured with ropes that requires caution.
Shortly before Sørvågen, you will pass the Sørvågen-Fossefall waterfall. From there, you can extend your tour to include the ascent of the 490-metre-high Tindstinden (T3), but you should leave your heavy luggage behind. In Sørvågen, there is a small but expensive shop, numerous accommodations and an excellent restaurant. Then continue along the road to Å i Lofoten. I found Å i Lofoten extremely worth seeing – be sure to allow enough time for this.
Tips for Å i Lofoten:
Tip: Lake Ågvatnet offers beautiful opportunities for wild camping. Alternatively, you can also use the shelter provided there.

Stage 11: Ågvatnet – Å i-Lofoten (12 km and 770m ascent)
On the last stage, you will have to cross a very steep pass (T4) and then descend over extremely steep terrain. Finally, you will reach the beach at Lake Stokkvikvatnet and Stokkvika-bay. After that, you have to go back the same way, but this time on the other side of Agvatnet. Before that, you can take in the viewpoint at Agvatnet. Then enjoy the numerous viewpoints south of Å in Lofoten. Your tour finally ends at the bus terminus in Å on the Lofoten Islands. If you've made it: congratulations – you have my utmost respect. It's not an easy journey, especially in bad weather.
To prepare yourself optimally for your hikes, I recommend the workouts on my YouTube channel.
Best time to go trekking in Lofoten
If you want to experience the rugged coastal and mountain landscape of Lofoten on foot, I would say that the months from June to September are particularly suitable. During this period, most trails are free of snow, the days are long and the conditions are generally the most stable. Temperatures are usually mild, often between 10 and 18 degrees, and the paths are easily accessible. However, this is also the most touristy period, especially around well-known places such as Reine or Å. On remote stages, however, you will still find peace and solitude.
In late summer and early autumn (late August to September), things slowly become quieter. The colours become softer, the light more dramatic, and the landscape appears even more pristine. At the same time, however, there is an increased risk of changeable weather, rain and the first storms. Snowfall at higher altitudes cannot be ruled out towards the end of September.
Regardless of the season, the weather in Lofoten can change very quickly. You will therefore need high-quality, waterproof hiking boots, warm and rainproof clothing in layers, reliable camping equipment, a headlamp (despite the long days), power banks and sufficient food.

Further information for crossing the Lofoten Islands
Below, I have listed some useful information for the long crossing of the Lofoten Islands:
Money: I was able to pay cashless everywhere. However, as always, I recommend taking some cash with you. You cannot exchange Norwegian kroner outside Norway, as the Norwegian central bank no longer allows this. If you have any cash left over at the end, you can exchange it again at an ATM at the airport, for example.
Mobile phone reception: Not always available in the mountains.
Emergency number: By dialling 112 (the European emergency number), people in emergency situations in all EU member states can reach the emergency centres of the rescue services, fire brigade or police free of charge. All mountaineers should also dial this number when out and about.
Wild camping: This is generally permitted in Lofoten. However, please note that there are restrictions in some areas.
Food: Here is a list of places where you can buy food:
Stage 2 – Sandsletta Camping (restaurant/shop)
Stage 3 – Svolvær (town)
Stage 5 – Leknes (town)
Stage 6 – Nusfjord (village)
Stage 7 – Ramberg (village)
Stage 11 – Å (village)
Gas cartridge: I bought gas on my way to the starting point in Svolvær. There are several outdoor shops there, for example:
Taxi: There is a central taxi rank in Svolvær, which you can find here. In addition, Svolvær Taxi is also available as an online provider.
Water: Available along the trail at various points, such as small waterfalls, lakes or in accommodation.

Packing list for trekking in Lofoten
Here I recommend the most important hiking equipment that I own, have tested myself and have also bought myself. I pay a lot of attention to the weight and quality of my equipment. The equipment should simply feel good on longer tours and also be light. I can recommend the equipment for women because my wife uses it and it is basically the same as the equipment for men.
Note: Please keep in mind that the packing list is general and you will have to adapt it depending on the season and your needs!
Advertising note: These product links are affiliate links. If you buy something through one of these links, I will receive a small commission without you having to pay more. This is for the maintenance of my blog and you support me with my project, for which I am very grateful. Thank you very much!
Clothes
Hiking boots
Hiking shorts
Long hiking pants
Functional shirt
Hybridjacket
Fleece-jacket
Rain jacket
Functional underwear
Hiking socks
Other hiking equipment:
• Sun cap
Hiking backback (approx. 60 litres or as required)
by EXPED - unfortunately not available on Amazon.
• Backback - Ospray (was my old one and is also good)
Technology and orientation:
• Compass
• Headlamp
• GPS device or GPS watch if necessary
• Binoculars if necessary
Catering:
• Sweets to keep up morale :)
Health & first Aid:
• First Aid (small and light)
• Tape
• Bivouac
• Toilet paper
Other:
• Passport/Insurance certificate
• cash
• Gas cartridge
Film equipment:
• Camera
• Drone
• Tripod
• Clip

Lofoten Crossing GPX
The GPX files are available for download from the following providers.
Outdooractive: https://out.ac/3xAkep
Long-distance hiking trails in Europe: 90 routes, all countries
Safety advice

FAQ – Frequently asked questions about trekking and crossing the Lofoten Islands
Is there enough water along the way?
Yes, there are water sources along the trail, such as small waterfalls, lakes and accommodation facilities.
What is the best way to get to the Lofoten Islands?
The easiest way to reach the archipelago is via Harstad/Narvik Airport (EVE) in Evenes. From there, you can easily reach your starting point by bus or taxi.
Do I have to walk a lot on roads during the Lofoten crossing?
Yes, some sections of the Lofoten crossing inevitably run along roads. However, most of these sections can be avoided by taking the bus.
Where does the Lofoten crossing start?
It starts directly at the Matmora-Delpen Trailhead near Delp.
What is the mobile phone reception like when trekking in Lofoten?
There is no continuous network coverage in the mountains.
Can you do the Lofoten crossing alone?
No, you should complete the trail with at least one other person, as it contains challenging sections.
What is the Lofoten crossing?
The Lofoten crossing is a challenging trekking route that stretches across several islands in the Lofoten archipelago. The trail leads over mountain passes, exposed ridges, secluded beaches and through traditional fishing villages. The crossing is traditionally divided into 11 stages. Some sections are alpine in nature and have a difficulty rating of up to T3, which is why sure-footedness, good orientation skills and trekking experience are required.
Can I stay in huts while trekking in Lofoten?
Yes, you can stay in the Norwegian Trekking Association (DNT) huts along the way. No reservation is required, so you can stay there spontaneously.
Is there a ferry connection on the Lofoten crossing?
Yes, on stage 9 you have to cross from Kjerkfjorden to the Tennesvann power station in Forsfjorde.
How difficult is the Lofoten crossing?
The Lofoten crossing is challenging – steep climbs, exposed ridges and changeable weather mean that sure-footedness, orientation and stamina are essential.
How long is the Lofoten crossing and how many days does it take?
The trail is 172 km long and usually takes 11 days to complete.
Are there any dangerous sections on the Lofoten crossing?
Yes, after Kvalvika Beach there is a section along the cliffs that is secured with ropes. The pipeline ascent on stage 3 is also very challenging.
When is the best time to cross the Lofoten Islands?
The best time for the Lofoten crossing is June to September.
During these months, the trails are mostly free of snow, the days are long and bright, and the weather is relatively stable.
Is wild camping allowed when trekking in Lofoten?
Yes. Wild camping is generally allowed in Lofoten. Observe the right of public access, avoid private property and nature reserves. Remote beaches, meadows or plateaus are ideal. Alternatively, you can use DNT shelters or campsites.
Can you pay cashless in Lofoten?
Yes, cashless payment is possible everywhere. However, as always, I recommend taking some cash with you.
Is there mobile phone reception on the trail?
There is not mobile phone reception everywhere in the mountains.
What emergency number do I need for crossing Lofoten?
You can reach the emergency services, fire brigade or police throughout Europe free of charge by dialling 112.
Where can I buy food on the Lofoten crossing?
Stage 1: Sandsletta Camping (restaurant/shop)
Stage 2: Svolvær (town)
Stage 4: Leknes (town)
Stage 5: Nusfjord (village)
Stage 6: Ramberg (village)
Stage 10: Å (village)
Where can I buy gas for camping stoves?
Gas cartridges are available in Svolvær. There are several outdoor shops there.
Are there taxis in Lofoten?
There is a central taxi rank in Svolvær. The online provider Svolvær Taxi is also available.
How do I book a bus ticket in Lofoten?
It is best to book your ticket in advance via the country's own REIS app. This way, you can secure a seat and have the route available digitally.
Who is the Lofoten crossing suitable for?
For hikers who already have experience in alpine hiking and have a head for heights.

Experiences and conclusions from my Lofoten trekking trip
Crossing the Lofoten Islands was an unforgettable adventure full of spectacular highlights for me. I hiked over steep ridges, past sparkling mountain lakes, secluded beaches and through traditional fishing villages that have retained their original charm. Again and again, I had the opportunity to experience the breathtaking coastal landscape and rugged mountains from new perspectives. The sunrises and sunsets, the reflective fjords and the many waterfalls are particularly unforgettable.
Along the way, I was also able to enjoy Norwegian cuisine: fresh fish straight from the fjords, delicious seafood and local specialities in small villages, often served by incredibly friendly people who were happy to offer tips and stories.
Sometimes the weather was challenging – rain, wind and slippery paths demanded my full concentration. In the evenings, after long stages, I enjoyed the peace and quiet of nature or small shelters. The fresh, clear air, the silence of the night and the feeling of being completely in the wilderness made up for every effort. Each stage was a mixture of challenge and deep connection with nature – peppered with countless highlights.
As always, I would be very happy to receive feedback via one of my channels.
You are also welcome to leave me a comment here.

Hello, I am Christian, the chief globetrotter of this Site and an enthusiastic adventurer, hiker and filmmaker. I love to explore new paths and inspire people with them, and I love to share my hiking knowledge with you! You can also find my videos on YouTube! On my blog you can find tips for beginners and professionals on the greatest and most beautiful hiking tours there are. I want to encourage people to explore the world as a hiker, whether in the countryside, through the forest or in the mountains. True to the motto: If you haven't hiked, you haven't seen the world,
On my blog, I also write about hiking gear, the right summit training and nature conservation, as well as tips and information about hiking.