Madeira crossing: Trekking-guide for the madeira coast to coast trek with guide, stages & accommodation
- Apr 10, 2023
- 27 min read
Updated: Apr 6
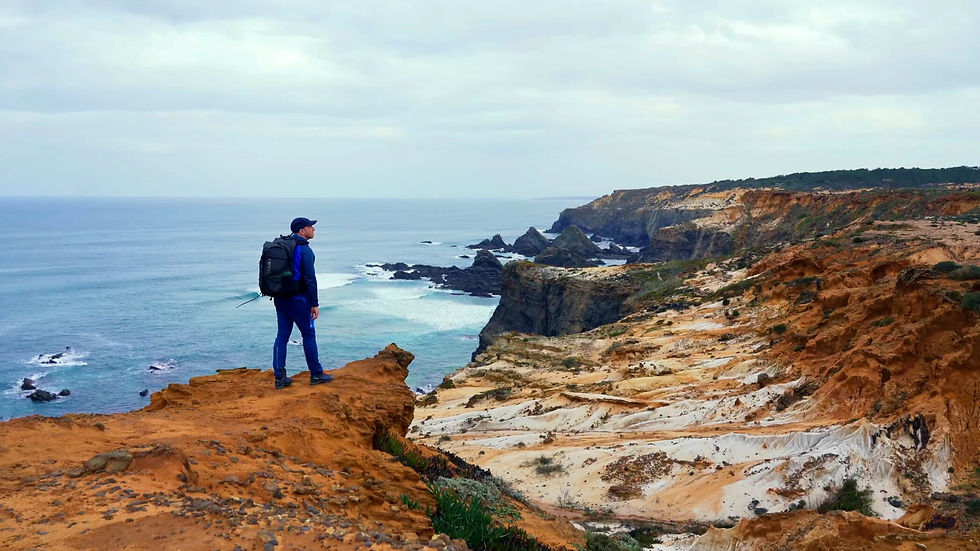
Madeira is a true paradise for hikers – an evergreen paradise of extraordinary beauty. On this island crossing, you will experience Madeira's most impressive landscapes and hike through a mountain world shrouded in mist in the midst of unspoilt nature. The rugged volcanic landscape is criss-crossed by levadas – centuries-old irrigation channels with narrow paths that have now become unique hiking trails.
The Madeira Island Crossing inspires with spectacular views, varied stages and excellent infrastructure. Comfortable accommodation and selected campsites await you along the route, allowing you to tailor your adventure to suit your needs. High peaks, deep valleys and sweeping views over the Atlantic make this crossing an intense nature experience that shows Madeira at its most pristine.

Contents
1. Getting there
2. Route
3. Stages
4. Guide
5. Further information
7. Packing list
8. GPX and map information
9. Conclusion
The Madeira Island Crossing at a glance
Length: approx. 105-125 km (65-78 miles)
Duration: 5–7 days, depending on fitness and stage planning
Elevation gain: approx. 6000 m
Difficulty: Moderately difficult in good weather, challenging in bad weather. Sure-footedness and safe navigation with a map or GPS are required.
Landscape: Dramatic cliffs, ancient water channels called levadas, Pico Ruivo (the highest mountain), Pico do Arieiro, ancient laurel forests (UNESCO World Heritage Site), jungle, green high plateaus and barren volcanic landscapes.
Highlights: Breathtaking views from the central high mountains, narrow levadas with tunnel passages, many waterfalls, the interplay of fog and sun in the mountains, sunrise and sunset on Madeira's highest mountain, and rugged volcanic landscape.
Accommodation: Campsites and comfortable accommodation available at each stage.
Best direction: East to west recommended, but also possible in the opposite direction.
Requirements: Very good physical condition, no fear of heights, experience in mountain hiking, confident navigation and robust equipment.
Official starting point: At the small roundabout in...
Trail markings: The Madeira Island Crossing is not officially signposted; a map and GPS are essential.
Weather: Can be very changeable. Even supposedly easy sections can become dangerous in fog and heavy rain. Use of the Windy app for weather monitoring is recommended.
Trail conditions: Few off-trail passages, muddy ground in heavy rain, otherwise well-trodden paths.

Getting to the Madeira Island Crossing
Getting to the Madeira Island Crossing is straightforward and easy to plan. The easiest way to reach Madeira is by plane, and then you can continue your journey comfortably by bus. The starting point is at the small roundabout in Ponta de São Lourenço. I'll show you all the options.
The official starting point for the Madeira Island Crossing
The official starting point is at the small roundabout in Ponta de São Lourenço.
Before you start, you need to decide which direction you want to take for the Madeira Island Crossing:
Options:
West → East (recommended): Start at the roundabout in Ponta de São Lourenço
East → West: Start at Porto Moniz
Flight: The best option is to fly to Funchal, to Madeira Cristiano Ronaldo International Airport (FNC). To find cheap flights, I highly recommend Skyscanner – a first-class app that gives you a quick overview of the best flight deals. Here you will find an overview of all relevant airports for your journey.
Bus: The 113 bus takes you from the airport at the bus station directly in front of the airport directly to the bus station at the small roundabout in Ponta de São Lourenço. The journey takes about 30 minutes. I highly recommend the OMIO app for booking bus and train tickets. You can also use the bus for the return journey. The journey is direct and takes 4 hours.
Taxi: You can take a taxi directly from the airport to the starting point, the small roundabout in Ponta de São Lourenço (Baía d'Abra). The journey was extremely cheap with a Bold taxi.
On foot: You can also walk to the roundabout. Leave the airport via the stairs and follow the pavement next to the motorway to the Caminho da Fonte do Seixo roundabout and continue to Machico or Caniçal. Allow an extra day for this. You can view the route here in Google Street View.
Tip: If you still need food or a gas cartridge, I recommend the ‘Modelo Continente Machico’ supermarket in Sitio da Queimada de Baixo, 9200-017 Machico, Portugal. The friendly Bold driver stopped there with me to do some shopping. Please check for yourself before starting your tour whether gas cartridges are in stock. There are also several outdoor shops in Funchal.
As always, I recommend watching my video about the tour:
Madeira trekking Route
This route covers approximately 105 kilometres and 6,000 metres of elevation gain. It took me a total of five days to complete the route – a fairly athletic pace. For those who prefer to take their time, I recommend allowing 6 to 7 days. On this long-distance hiking trail, you will experience all the major highlights of the island: the impressive peaks of Pico do Arieiro and Pico Ruivo, numerous magical waterfalls, a 1-kilometre-long tunnel through a mountain and the mystical laurel forest of Fanal. The route also takes you across the plateau, along the cliffs at Caniçal and through the levadas of Rabacal. Traditional villages and unspoilt nature make crossing Madeira Island an unforgettable experience.
Waymarkers on the Madeira Island Crossing
The trail is not marked throughout, but the paths are well trodden and easily recognisable. However, in thick fog or in the dark, orientation can be much more difficult.
Path closures
Here you can find the ProCic Madeira app. With this app, you will receive notifications and warnings about path closures, weather, etc.
Difficulty of the Madeira Island Crossing
The difficulty of the Madeira Island Crossing is classified as moderate. However, in bad weather, conditions can change quickly and dramatically. Most of the trail is on easy terrain, with only occasional steep sections.
The creation of the Madeira Island Crossing
The island crossing was put together by HikingFex.com from existing hiking and levada trails. The aim was to enable a continuous crossing of the entire island, taking in as many of Madeira's scenic and cultural highlights as possible.

Madeira Island Crossing Stages
The Madeira Island Crossing is an impressive hike that takes you through the island's varied landscape in several stages. The Madeira Island Crossing can be divided into seven stages. I completed the tour in five days. I have listed both options for you.
For sporty types (105 km):
Stage 1: Ponta de São Lourenco roundabout – Canical approx. 13 km (alternatively, use the campsite in PONTA DE SÃO LOURENÇO or a room in Canical)
Stage 2: Canical – Ribeiro Frio approx. 25 km (campsite available)
Stage 3: Ribeiro Frio - Pico Ruivo approx. 21km (camping site and mountain hut available)
Stage 4: Pico Ruivo - Seixal approx. 35km and approx. 1200m ascent (Attention: very long stage, but can be shortened). Alternatively, you can book a room in Boca da Encumeada or use one of the two campsites nearby. The campsites are called CHÃO DOS LOUROS and BICA DA CANA.
Stage 5: Seixal - Port Moniz approx. 23 km
Classic (125 km):
Stage 1: Ponta de São Lourenço roundabout - Canical (13 km and 250m ascent)
Stage 2: Canical - Porto da Cruz (13 km and 580m ascent)
Stage 3: Porto da Cruz - Ribeiro Frio (20km and 1060m ascent)
Stage 4: Ribeiro Frio - Pico Ruivo (21km and 1500m ascent)
Stage 5: Pico Ruivo - Boca da Encumeada (21km and 1080m ascent)
Stage 6: Boca da Encumeada - Seixal (15km and 160m ascent)
Stage 7: Seixal - Port Moniz (23km and 1580m ascent)

Accommodation on the madeira coast to coast trek
There is a wide range of accommodation options along the Madeira Island Crossing, from charming guesthouses and hotels to cosy campsites. Many of these accommodations also offer spectacular views of the sea or mountains. In Ribero Frio, Boca du Encumeada and Seixal, it is not so easy to find accommodation, so I recommend a mix of camping and accommodation for the entire tour.
You can book directly via these links without it costing you a penny more. Thank you very much! PS: You can find the campsites in the next section of the article!
Tip: Book your hotel or hostel early, as accommodation in Madeira often sells out quickly. At Booking.com, you can usually cancel your accommodation free of charge up to one day in advance for a small surcharge.
Stage 1: Canical
Campsite – Ponta de São Lourenço - (Map click here)
Stage 2: Porto da Cruz
Stage 3: Ribeiro Frio
Campsite - Ribeiro Frio - (Map click here)
Stage 4: Pico Ruivo
Campsite - Pico Ruivo - (Map click here)
Stage 5: Boca du Encumeada
Campsite - Chão dos Louros - (Map click here)
Stage 6: Seixal
Campsite - Fanal - (Map click here)
Stage 7: Port Moniz
Campsite - Port Moniz - (Map click here)
Trekking camps in Madeira
On the map below, I have marked all the tent sites, the mountain hut on Pico Ruivo and other bookable accommodation. Alternatively, you can also visit the official website HERE. I have listed the tent sites below.
Stage 2: Ribeiro Frio – Santana
Stage 3: Pico Ruivo
Stage 4: Chão dos Louros – São Vicente or Bica da Cana or Estanquinhos
Stage 5: Fanal
Stage 6: Port Moniz Campsite
Other trekking camps:
Fonte do Bispo – Calheta

Registration for the campsites: The island offers a number of campsites that can be used free of charge by adventure-seekers. All but a few of the trekking campsites on Madeira are free of charge. For your trekking adventure, however, you must register once at the following link and reserve a pitch. You will then receive a pdf document for your reservation. In rare cases, rangers come by and check the trekking campers.http://www.madeiracamping.com/permission/
Facilities at the trekking camps: The campsites are all equipped differently. On the official homepage you will find signs and information about what is available on the campsites and in their surroundings.

Mountain hut on Pico Ruivo: There is a mountain hut and a small campsite on Pico Ruivo where you can spend the night. The hut is called "Casa de Abrigo Pico Ruivo" and can be found under the following link: https://picoruivo.com/pt/
Remember to insure your trip well – because a fall or other typical hiking injury can quickly result in high rescue costs. Auras Insurance offers you worldwide hiking and trekking insurance, specially designed for active travellers.
Use the discount code HIKINGFEX to get 10% off your insurance.

Madeira Island Crossing: Guide & Highlights
In this guide, I will give you a detailed introduction to each stage of the Madeira Island Crossing. My experiences are as varied as the island's landscapes themselves. Since most hikers today use smartphones or GPS, I have deliberately avoided providing detailed route descriptions. Instead, I focus on insider tips, special features along the trail, unique nature experiences and highlights along the route and at the end of each stage.
Stage 1: Ponta de Sao Lourenco roundabout – Canical (13 km and 250 m ascent)
The first stage of the Madeira Island Crossing begins at the small roundabout in Ponta de São Lourenço (Baía d'Abra) on the east coast of the island. Even here, there is a special atmosphere in the air: hikers, photographers and nature enthusiasts from all over the world gather at the starting point – a perfect start to your adventure across Madeira. The route across the São Lourenço peninsula is technically easy but scenically spectacular. You will hike through a rugged volcanic landscape with bizarre rock formations, steep cliffs and impressive views of the Atlantic Ocean. Numerous viewpoints line the trail – take your time to enjoy them all:
An absolute highlight awaits you at Miradouro Ponta do Furado, where one of the most beautiful views of the entire peninsula opens up before you.
In this barren, volcanic landscape, you should consciously take your time and enjoy the stage. On the way back from the peninsula, it is advisable to hike along the north coast and take in more viewpoints.
Please note: In some places, you will be walking off the marked paths – so be sure-footed and protect the sensitive vegetation.
Other worthwhile stops include:
Then leave the trail and follow the road for a short while. After a few minutes, you can make a detour to Prainha do Caniçal – perfect for a refreshing break by the sea. If you want to see an interesting rock formation, you can visit Vulva Rock right next door. Afterwards, you will reach the idyllic coastal village of Caniçal. Here you will find shopping facilities and several restaurants. My tip: Be sure to try a restaurant serving typical Madeiran cuisine. I recommend accompanying your meal with a glass of regional port wine.
Tips for Caniçal
Swim break at Beach Pedra da Eira
Walk along the harbour promenade
Accommodation tip: On the first stage, you can use the trekking camp in Ponta de São Lourenço. Alternatively, there is accommodation available in Caniçal or Machico. You can also easily reach Machico via a T2 hiking trail hiking trail.
Take a look at the following pictures in the slider:


Stage 2: Canical - Porto da Cruz (13 km and 580 m ascent)
After a spectacular sunrise, you are greeted by a clear, deep blue sky. Your hiking heart beats faster – because this stage is one of the most scenically impressive of the entire Madeira Island Crossing. A spectacular coastal hike along the north coast of Madeira awaits you, leading to the Boca do Risco viewpoint and on to Porto da Cruz.
Tip: Start very early and experience the sunrise at Ponta do Bode or Alice Peak. As the sun slowly rises above the horizon and bathes the volcanic rock formations in warm light, a unique natural spectacle unfolds.
Then follow the Vereda Boca do Risco, a breathtakingly beautiful coastal path that stretches spectacularly along steep cliffs. Despite my own fear of heights, the path was easily manageable without any feeling of insecurity. However, sure-footedness is essential, as the cliffs to the sea are extremely high in places.
In bad weather, especially heavy rain or strong winds, this section can be dangerous. In this case, you should take a route through the interior or take a day's break.
At Miradouro Boca do Risco, one of the island's most famous views awaits you. Then continue your hike on the Vereda do Larano. Another viewpoint offers spectacular views before you finally see the first houses of Porto da Cruz.
Shortly before the end of the stage, there are two additional viewpoints that are worth visiting, either on the way or on the way back the next day:
Tips for Porto da Cruz
Evening stroll along the promenade
Visit to the Companhia dos Engenhos do Norte (traditional rum distillery)
Accommodation tip: A room in Porto da Cruz or continue directly to the campsite in Ribeiro Frio.
Due to the long distance and the sweaty altitude difference, I would like to recommend my ultra-light hiking gear at this point:
I would also like to recommend my beloved Salewa trekking shoes because of the mountain and jungle landscape and the challenging mountain trails:
‘Give a woman the right shoes and she can conquer the world.’ Quote from Marilyn Monroe


Stage 3: Porto da Cruz - Ribeiro Frio (20km and 1060m ascent)
Today you will hike along the levadas, Madeira's traditional water channels, and immerse yourself in the island's green ‘jungle’ for the first time. Ferns, moss-covered trees and dense laurel forest accompany you on this particularly atmospheric stage.
First, return to the cable car and take the ascent to Vereda das Funduras, which you follow to Portela. The path is easy to walk on and technically uncomplicated, ideal for a relaxed arrival in the interior of the island.
Note: On this stage, you will pass through a short tunnel for the first time.
In Portela, you should definitely take a longer break. A beautiful viewing platform with a sweeping view of the north coast, an excellent steak restaurant and a memorial sculpture worth seeing await you right on the trail.
Then begins a real highlight of the Madeira island crossing: the hike along the Levada do Furado. This section is exceptionally beautiful and pleasantly quiet. Apart from the gentle splashing of the water and the singing of the birds, there is an almost meditative silence here. Numerous viewpoints are located directly on the path, so that new perspectives open up again and again – it would hardly be necessary to list them all here.
The trail is not particularly difficult, but sure-footedness is still required. However, the more tricky sections are well secured with railings. Finally, you reach the small mountain village of Ribeiro Frio, idyllically nestled in the laurel forest. Here you will find a small, somewhat hidden campsite, a restaurant and permanent accommodation. However, due to the popularity of the Madeira Island Crossing, these are often booked up well in advance.
Tips for Ribeiro Frio
Extensive dinner in the restaurant
Visit to the historic Antiga Casa de Chá (entrance not recommended)
Visit to the Ribeiro Frio waterfall
Viveiros de Trutas (trout farm)
Visit to the small Chapel in the village
Detour to the Miradouro dos Balcões viewing platform at sunset
As you have already left the jungle and there is little shade and you are constantly exposed to the movement of the air, I recommend my beloved Piz Buin Mountain sun cream with SPF 50+ lip care, as well as my ultra-light sun cap and wind blocker.
• Sun cap
"The sun also shines behind the clouds." Quote from Karl Friedrich Wilhelm Wander


Stage 4: Ribeiro Frio – Pico Ruivo (21 km and 1,500 m ascent)
Now it's time to gather your strength for the climb. Today, you'll be sweating your way steadily uphill to Pico do Arieiro and then continuing along the Royal Trail – probably the craziest but also the most beautiful trail I've ever hiked – to Madeira's highest peak, Pico Ruivo.
It's best to start early after a hearty breakfast and then make a detour to the Miradouro dos Balcões viewing platform. Especially in the morning, and particularly when it's foggy, there's a very special, mystical atmosphere there. Afterwards, a steep but technically not particularly difficult climb awaits you.
Please note: At kilometre 41 of the trek, there is a small change in the route. The ascent to the plateau now follows a path that is the same length but completely different. It runs mostly along game fences and is well signposted. Simply follow the trail markers and signs towards Pico do Arieiro.
After a large plateau with great views, cross the road and follow the Vereda do Burro up to Pico do Arieiro at 1,818 m. There you can visit the restaurant and the viewing platforms Mirado do Juncal and Mirado do Tarm. Be sure to take some time here and enjoy a long break – there are numerous other spectacular viewpoints like this viewpoint with impressive views.
The rest of the King's Trail again includes many viewpoints and scenic highlights, which I will not list individually as you will be hiking right past them. I did not find the King's Trail particularly difficult from a technical point of view, but you should definitely be careful in bad weather.
Your stage finally ends at Madeira's highest mountain, Pico Ruivo. There you will find a mountain hut and a small campsite.
Shelter: The hut is called Casa de Abrigo do Pico Ruivo and can be found at the following link: https://picoruivo.com/pt/
Tip: If the campsite is full, you may be able to pitch your tent right next to the hut for a small fee. During my tour, there were numerous tents right next to the mountain hut. The hut owner was very relaxed at the time, and I suspect that camping there is still possible today for a small fee.
Enjoy the following pictures in the slider!


Tip: The sunrise and sunset at Pico Ruivo were simply breathtaking – a real sensation! Pure goosebumps!
Enjoy the following pictures in the slider!


Stage 5: Pico Ruivo – Boca da Encumeada (21 km and 1,080 m ascent)
The magnificent sunrise at Pico Ruivo left a lasting impression on me. In this almost spiritual moment, I felt a deep connection with nature and a sense of inner peace. I hope you will have similar experiences at this place of power.
Now you will embark on a mostly easier descent route, which is interrupted by short ascents and descents. Similar to the Königsweg, this stage is a real adventure. The path is linear, and you will once again pass numerous viewpoints directly n the trail. In addition, there are many steps to negotiate, constantly going up and down – a truly crazy path.
Special caution is advised in bad weather, as the ground can become very slippery. In Boca da Encumeada, you will find several viewpoints and a snack bar serving small hot meals – the perfect place for a break, as it is located about halfway along the route. There is also a restaurant with an inviting terrace and great views.
The rest of the trail follows the Levada do Norte. After a short time, you will reach the first very long tunnels that you have to pass through – a real adventure. I know of hardly any other hike with such impressive tunnel passages. However, if you suffer from claustrophobia, you may want to avoid this section.
Along the way, there are also several small detours to rewarding waterfalls that you should not miss.
Tip: If you want to explore the area around the Risco waterfall the next day, it is advisable to stay overnight at this campsite. Your next stage to Seixal will then be shorter, and you will have enough time for another absolute highlight of the island. With an extra day, you can explore the entire area around the Risco-waterfall at your leisure – well worth it.

Stage 6: Boca da Encumeada - Seixal (15 km and 160 m ascent)
If you are staying overnight in Seixal, today's stage is only a few kilometres long with a relatively low elevation gain. This gives you plenty of time to plan a detour to the Risco waterfall and Lagoa das 25 Fontes – both of which are absolute highlights on Madeira. Unfortunately, these places are also very popular, especially during peak season.
For this detour, take the Caminho dos Pessegueiros and then the Verada do Fanal, which will take you to the 25 Fontes and on to the Risco Waterfall. Then continue your hike along the Verada da Terra Chã until you finally reach Seixal, where your stage ends. There you will finally have the opportunity to replenish your supplies in a proper supermarket.
Tips for Seixal
Tip: Seixal has one of the most beautiful beaches on the island. The black volcanic sand is shiny and exceptionally soft. The village itself is extremely idyllic – take your time, enjoy the atmosphere and treat yourself to a well-deserved break here.
Don't forget to take an emergency bivouac with you. It consists of an emergency blanket that is cold-resistant, a whistle and a mini compass. It should be in your backpack on every hike anyway.
As the old Scottish saying goes: "There's no such thing as bad weather, only bad clothes!"

Stage 7: Seixal – Porto Moniz (23 km and 1580 m ascent)
Now it's time to grit your teeth again: another sweaty climb awaits, up to the laurel trees at Fanal Pond – one of the next big highlights on Madeira. This place is particularly impressive in foggy weather: a mysterious, almost mystical atmosphere descends on the landscape, which you may recognise from numerous Instagram photos.
I was most impressed by the famous witch tree. You can reach the Fanal forest via the beautiful Verada da Cavaca. Once at the top, it's worth making a detour to a viewpoint before diving into the laurel forest. Then follow a section of the Vereda do Fanal and take your time to explore the entire area – it is simply fantastic. A walk around the Lagoa de Fanal is particularly recommended.
Then continue on the Levada dos Cedros, which once again impresses with its peaceful, unspoilt atmosphere. On the way, you will pass several small waterfalls. After crossing another road, you can take a short detour to reach the Curral Falso viewpoint.
Please note: At kilometre 78 of the trek, there is a small change in the route. Do not follow the well-trodden paths to the north, but stay on the official path, which turns left!
Please note: At kilometre 102, there is another important change in the route. After the last ascent, you will circle around Pico de Caldeiro and then turn right onto a very narrow footpath towards Porto Moniz. Shortly afterwards, you will reach a small stone hut. Directly in front of this hut, turn right and immediately follow a small rainwater channel to the left until you reach the houses.
In Ribeira da Janela, you should definitely treat yourself to another viewpoint. A short detour to the coast is also well worth it.
Tips for Ribeira da Janela:
After a final ascent, the trail finally descends towards Porto Moniz. But before you do, be sure to take in the viewpoint with its spectacular rock formations. Porto Moniz is the north-westernmost town in Madeira and is best known for its impressive natural swimming pools surrounded by bizarre lava rocks. Head to the western end of the town and gaze out into the vastness of the Atlantic Ocean. You have reached your destination – congratulations! If you've made it, you have my utmost respect. It was not an easy journey, but it was unforgettably beautiful. This tour is my absolute favourite!
Tips for Porto Moniz:
‘If you haven't hiked, you haven't seen the world.’ Quote from Christian Sommer alias HikingFex

To prepare yourself optimally for your hikes, I recommend the workouts on my YouTube channel.
Weather & best time to travel for the Madeira Long Distance Trail
In Madeira, there is often a mix of sun, wind and clouds. Temperatures are always between 18 and 30 degrees. The months with the least rainfall are July and August. The months of April, May and June are also ideal for hiking. In general, you can complete the tour all year round, although there may be snow on the mountains in winter. So enquire before starting your tour.
Proverb from Madeira. Come into my garden. I want my roses to know you. Richard B. Sheridan 1751 - 1816.

Madeira Thru Hike – More Information about Trekking on the Island
Money: ATMs and credit cards are available in many places. You should still take enough cash with you on your trip. At the mountain hut on Pico Ruivo, they only take cash.
Water: Unfortunately, you won't always find this. Make sure your water tank is always well filled. I usually had around 2.5 litres with me. You shouldn't drink the water from the lavedas. This is industrial water for agriculture. Sometimes there are also waterfall basins or fountains along the way. However, you should definitely use a water filter. No matter how clear the water may be, it may still contain impurities such as animal faeces or dead animals. However, you can also boil the water.
Water at the campsites: You won't find any water at the trekking camps themselves. You won't always find it on the route either, but there were never any real problems getting water. In the mountains it was possible to fill up at waterfalls (be careful: use a filter anyway!). Otherwise, there is a well or local supply in every larger village. Sometimes there is also a tap at houses. Thanks to the friendly inhabitants, I was able to top up my water supply. Nevertheless, I always used a water filter to be on the safe side.
Food on the Madeira Island Crossing
In the towns of Caniçal, Porto da Cruz, Machico, Seixal and Porto Moniz, you will find supermarkets where you can easily stock up on supplies. In Ribeiro Frio and Boca da Encumeada, there is a restaurant in each town that is ideal for a hot meal or a longer break. The huts at Pico Ruivo and Pico Areeiro offer small snacks and drinks – perfect for replenishing your energy reserves after the stage.
Animals or pests: There are practically no pests on the island and it is free of dangerous insects and bugs. But be careful when pitching your tent. I had a damn big spider in the undergrowth. It was a bit of a scare.
Surefootedness: To be safe on the trail, sure-footedness and the right footwear are the most important factors - after all, falls due to tripping and slipping are the most common cause of accidents when hiking. So remember: the right footwear and the right walking technique are therefore incredibly important. You are sure to find the right footwear in the article below!

Packing list for the Madeira island crossing
Here I recommend the most important hiking equipment that I own, have tested myself and have also bought myself. I pay a lot of attention to the weight and quality of my equipment. The equipment should simply feel good on longer tours and also be light. I can recommend the equipment for women because my wife uses it and it is basically the same as the equipment for men.
Note: Please keep in mind that the packing list is general and you will have to adapt it depending on the season and your needs!
Advertising note: These product links are affiliate links. If you buy something through one of these links, I will receive a small commission without you having to pay more. This is for the maintenance of my blog and you support me with my project, for which I am very grateful. Thank you very much!
Clothes
Hiking boots
Hiking shorts
Long hiking pants
Functional shirt
Hybridjacket
Fleece-jacket
Rain jacket
Functional underwear
Hiking socks
Other hiking equipment:
• Sun cap
Hiking backback (approx. 60 litres or as required)
by EXPED - unfortunately not available on Amazon.
• Backback - Ospray (was my old one and is also good)
Technology and orientation:
• Compass
• Headlamp
• GPS device or GPS watch if necessary
• Binoculars if necessary
Catering:
• Sweets to keep up morale :)
Health & first Aid:
• First Aid (small and light)
• Tape
• Bivouac
• Toilet paper
Other:
• Passport/Insurance certificate
• cash
• Gas cartridge
Film equipment:
• Camera
• Drone
• Tripod
• Clip

Long-distance hiking trails in Europe: 90 routes, all countries
Safety advice

Madeira Trekking GPX and map
The GPX files are available for download from the following providers.
Outdooractive: https://out.ac/I3hJdc
Here is the route on the map (Madeira trail map):

FAQ – Madeira Island Crossing: Frequently asked questions
What is the Madeira Island Crossing?
The Madeira Island Crossing is a spectacular long-distance hiking trail across Madeira. Covering approximately 105–125 km and around 6,000 metres of elevation gain, you will experience the entire diversity of the island: rugged volcanic landscapes, laurel forests (UNESCO World Heritage Site), narrow levadas, impressive waterfalls, high peaks such as Pico Ruivo and Pico do Arieiro, and fantastic coastal views. The tour can be completed in 5–7 days, depending on your fitness level and stage planning.
How long is the trail and how difficult is it?
Length: approx. 105–125 km (65–78 miles)
Ascent: approx. 6,000 metres
Difficulty: moderate to challenging (significantly more difficult in bad weather)
Requirements: Very good physical condition, no fear of heights, experience in mountain hiking, confident navigation, robust equipment
Trail conditions: Mostly easy-to-walk paths, some muddy spots when it rains, few pathless passages
Navigation: Not officially signposted, GPS or map essential
What is the best route/stage planning?
Sporty (5 days, 105 km):
Stage 1: Ponta de São Lourenço – Caniçal (13 km)
Stage 2: Caniçal – Ribeiro Frio (25 km)
Stage 3: Ribeiro Frio – Pico Ruivo (21 km)
Stage 4: Pico Ruivo – Seixal (35 km, 1,200 m elevation gain, alternative shorter route via Boca da Encumeada)
Stage 5: Seixal – Porto Moniz (23 km)
Classic (7 days, 125 km):
Stage 1: Ponta de São Lourenço – Caniçal (13 km, 250 m elevation gain)
Stage 2: Caniçal – Porto da Cruz (13 km, 580 m elevation gain)
Stage 3: Porto da Cruz – Ribeiro Frio (20 km, 1,060 m elevation gain)
Stage 4: Ribeiro Frio – Pico Ruivo (21 km, 1,500 m elevation gain)
Stage 5: Pico Ruivo – Boca da Encumeada (21 km, 1,080 m elevation gain)
Stage 6: Boca da Encumeada – Seixal (15 km, 160 m elevation gain)
Stage 7: Seixal – Porto Moniz (23 km, 1,580 m elevation gain)
Getting there for the Madeira Island Crossing
Flight:
Destination airport: Funchal (Madeira Cristiano Ronaldo, FNC)
Skyscanner recommended for cheap flights
Bus:
Bus line 113 takes you directly from the airport to the Ponta de São Lourenço roundabout (~30 min)
OMIO app for booking tickets
Taxi:
Directly from the airport to the starting point, usually inexpensive
On foot:
Possible, allow approx. 1 extra day
Route: Sidewalk next to the expressway to the Caminho da Fonte do Seixo → Machico/Caniçal roundabout
Shopping before the start:
Supermarket ‘Modelo Continente Machico’
Outdoor shops in Funchal
How do I get to the starting point of the island crossing?
Recommended start: Ponta de São Lourenço (east → west)
Alternative direction: Porto Moniz (west → east)
Flight: Funchal, Madeira Cristiano Ronaldo Airport (FNC)
Bus: Line 113 from the airport to the Ponta de São Lourenço roundabout (~30 min)
Taxi: Directly from the airport
Walk: approx. 1–2 hours from the airport to the roundabout
Food for the Madeira island crossing
Supermarkets: Caniçal, Porto da Cruz, Machico, Seixal, Porto Moniz
Restaurants: Ribeiro Frio, Boca da Encumeada, Pico Ruivo Mountain hut & restaurant at Pico do Arieiro
Self-catering: Trekking food (Travellunch), snacks, energy gels
Water: Do not drink from levadas, filter recommended, refill water at fountains, waterfall basins or friendly locals
What accommodation is available along the route?
Campsites: Free or small fee, registration at madeiracamping.com
Mountain hut: Casa de Abrigo Pico Ruivo (website)
Hotels/guest houses: In Caniçal, Porto da Cruz, Ribeiro Frio, Seixal, Porto Moniz
Tip: Mix of tent and accommodation recommended, book early
Where can I get food along the way?
Supermarkets: Caniçal, Porto da Cruz, Machico, Seixal, Porto Moniz
Restaurants: Ribeiro Frio, Boca da Encumeada
Pico Ruivo mountain hut: Snacks and drinks
Tip: Always carry water with you and use a water filter if necessary, as water from levadas is not drinkable
What equipment should I take with me?
Clothing:
Hiking boots (e.g. Salewa MS Raven 3 GTX)
Short and long hiking trousers
Functional shirts
Hybrid and fleece jacket
Rain jacket
Functional underwear, hiking socks
Equipment:
Tent (ultralight, e.g. Nemo 900 g)
Sleeping bag, sleeping mat, hut sleeping bag
Emergency bivouac (blanket, whistle, mini compass)
Hiking poles, sun hat, sun cream, sunglasses
Rucksack (approx. 60 l), rain cover
GPS device/maps/compass, power bank, head torch
Food:
Hydration system (min. 3 l), snacks, energy gel, gas stove
First aid & safety:
Small first aid kit, blister plasters, tape, tick tweezers
Mini satellite phone (optional)
What is the weather like and when is the best time to travel?
Temperatures: 18–30 °C
Driest months: July & August
Best hiking season: April–June or September–October
Please note: The weather can change very quickly, and even easy sections can become dangerous in fog or rain
Tip: Use an app such as Windy to monitor the weather
What highlights should I not miss on the island crossing?
Pico Ruivo & Pico do Arieiro (highest and second highest mountains)
Fanal laurel forest, witch tree
Risco & 25 Fontes waterfalls
Levada do Furado and Levada dos Cedros
Cliffs at Caniçal and Porto da Cruz
Natural swimming pools in Porto Moniz
Viewpoints: Miradouro dos Balcões, Miradouro Boca do Risco, Curral Falso, Ribeira da Janela
How do I find my way around the route?
Not officially marked, GPS or map required
Hiking apps: Komoot, Outdooractive, Bergfex
Pay attention to local information and route changes (e.g. km 78 & 102)
Are there any special safety instructions?
Sure-footedness and a head for heights required
Take care in fog, rain or wind
Always carry emergency bivouac gear
Do not drink water directly from levadas
If you suffer from claustrophobia: avoid tunnels on the Levada do Norte
What is the mobile phone reception and internet like?
LTE is usually available, but there are some dead spots in the mountains
GPS/offline maps are therefore recommended
What animals or pests are there?
Hardly any pests, no dangerous insects
Occasional spiders in the undergrowth
Money and payment options
Many places accept credit cards or debit cards
Always carry cash with you (especially the Pico Ruivo mountain hut)
Where can I download GPX files and maps?
How much time should I allow for the Madeira Island Crossing?
Sporty: 5 days (approx. 105 km)
Leisurely hiking: 7 days (approx. 125 km)
Allow extra time for highlights such as the Risco waterfall
Is there insurance for the Madeira Island Crossing?
Worldwide hiking & trekking insurance recommended
Example: Auras Insurance – 10% discount with code: HIKINGFEX
What makes the Madeira Island Crossing special?
Unique mix of volcanic landscape, levadas, laurel forest, coastal paths and mountain trails
Breathtaking viewpoints and waterfalls
Combination of nature, culture, comfort (accommodation) and adventure
The island shows itself from its most pristine side, with misty atmospheres, jungle vibes and dreamlike sunrises and sunsets

Crossing Madeira Island: My conclusion on the long-distance hiking trail
The island crossing with a length of almost 105 km is a fantastic long-distance hiking trail that offers an incredible amount. It shows a cross-section of the beautiful landscape of Madeira. I really enjoyed the tour! It is my absolute favourite tour. Have a great time and good luck ;)
As always, I would be very happy to receive feedback via one of my channels.
You are also welcome to leave me a comment here.

Hello, I am Christian, the chief globetrotter of this Site and an enthusiastic adventurer, hiker and filmmaker. I love to explore new paths and inspire people with them, and I love to share my hiking knowledge with you! You can also find my videos on YouTube! On my blog you can find tips for beginners and professionals on the greatest and most beautiful hiking tours there are. I want to encourage people to explore the world as a hiker, whether in the countryside, through the forest or in the mountains. True to the motto: If you haven't hiked, you haven't seen the world,
On my blog, I also write about hiking gear, the right summit training and nature conservation, as well as tips and information about hiking.


Great tips and article. I will be doing this trip in May 2026. I'm just curious why the east to west direction is recommended instead of the west to east? Is it more scenic this way?
Hello, this is Vidhu from India :). I am planning to hike this route in July this year. May I know if you paid for the campsites. Because frankly, the simplifica links don't open. I have seen people wild camp there but many have stayed in hotels too.
Great review, we are planning this route this year! Any information how to get from the end back to the airport?
Thanks for sharing all the information, tips and advices. Very useful!
When you walked did you have to pay any taxes to use the trails? We've seen the following page: 27677/2025 - Pagamento de Taxas para Percursos Pedestres Classificados - Geral - SIMplifica Can you confirm which trails you walked?
Thank you.